Exam Objectives
Quick Overview of Training Materials
Exam Ref 70-486: Developing ASP.NET MVC 4 Web Applications - Objective 3.6
Programming ASP.NET MVC 4 (OReilly) - Chapter 13
Professional ASP.NET MVC 5 (WROX) - Chapter 8 (§ on Improving Ajax Performance).
(MSDN) How to: Compress and Extract Files
Using CDN for Azure
How to Enable Content Delivery Network (CDN) for Azure
Programming ASP.NET MVC 4 (OReilly) - Chapter 13
Professional ASP.NET MVC 5 (WROX) - Chapter 8 (§ on Improving Ajax Performance).
(MSDN) How to: Compress and Extract Files
Using CDN for Azure
How to Enable Content Delivery Network (CDN) for Azure
The WROX book covers these optimizations in the Ajax chapter. It's short and sweet but a good section. The OReilly book, though, has a whole chapter on optimization, which includes all the subjects of this objective plus a lot of other best practices. The Exam Ref... well... meh...
Bundle and Minify
Bundling is the practice of joining multiple files into a single file, reducing network overhead by reducing the number of requests. Bundling, by itself, doesn't actually reduce the amount of data transfered. Minification, on the other hand, reduces file sizes by eliminating white space and comments, shortening variable names, and in-lining data (eliminating the need for a variable all together).
Creating a bundle is accomplished in the BundleConfig.cs file under App_Start. The default application already includes some libraries in bundles. Here is what it would look like if we want to create a bundle called "customJs" that contains our four script files, a style bundle called "customCss", and we wanted to enable minification in debug mode:
bundles.Add(new ScriptBundle("~/bundles/customJs").Include(
            "~/Scripts/custom*"));

bundles.Add(new StyleBundle("~/Content/customCss").Include(
            "~/Content/custom*"));

BundleTable.EnableOptimizations = true;
Note that the wildcard can only be included at the very end of the string in the Include method, otherwise you get an ArgumentException:
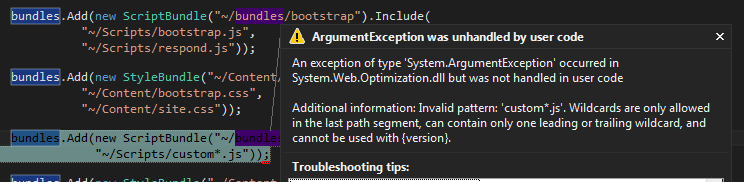
Once the bundles are created, they can be used in your Razor views by calling the .Render method on the appropriate helper:
@Scripts.Render("~/bundles/customJs")
@Styles.Render("~/Content/customCss")
Now, it's worth noting that in debug mode, the files won't be bundles, they will be rendered individually. In order to see the bundled files, you have to change a setting in web.config. Under system.web, the compilation element must have the debug attribute set to false:
  <system.web>
    <authentication mode="None"/>
    <compilation debug="false" targetFramework="4.5"/>
    <httpRuntime targetFramework="4.5"/>
  </system.web>
The framework will automatically minify the bundle. The follow two screenshots illustrate the difference this process can make:


The number of requests are cut in half, the total data transferred is cut from 423KB to 85KB (a reduction of 80%) and the time to finish was reduced from 438ms to 177ms (a 60% reduction). Looking at one of the minified files, we can see where comments and white space were removed, variables shortened or in-lined, and the whole thing packed together with the other script files:

One bone I need to pick with the Exam Ref. He claims that compressing all of the script files into one file for download incurs a cost as "you have slightly increased the amount of time it takes to find the necessary function or other item from within that file". Now, I'm no expert on the inner workings of JavaScript, so there may be something in the spec that may indicate this is true. But to the best of my knowledge, all of the script files are read into memory on the browser when the page is loaded, and how those files were separated would really make no difference. It's all in the same heap. When I posed the question to google, the answers I got back were related to picking the right strategy on which which files to bundle together based on when they might change. Which makes sense.
One nugget of wisdom, if you didn't already know: load scripts at the bottom of the page, and not in the <head> tag. Script loads are blocking and will prevent the rest of the page from rendering.
Compress and Decompress Data
Compressing the response is generally handled by IIS. If the "Accept-Encoding" header on the request is set to "gzip, deflate", then the web server will return a compressed response which is then unzipped by the browser. The OReilly book includes some xml configuration that can be included in the system.webserver element of the Web.config to ensure that compression is enabled in IIS, though it seemed to have no effect in the example app because it was already configured. Go figure:
  <system.webServer>
    <modules>
      <remove name="FormsAuthentication"/>
    </modules>
    <httpCompression directory="%SystemDrive%\inetpub\temp\IIS Temporary Compressed Files">
      <scheme name="gzip" dll="%Windir%\system32\inetsrv\gzip.dll" />
      <dynamicTypes>
        <add mimeType="text/*" enabled="true" />
        <add mimeType="message/*" enabled="true" />
        <add mimeType="application/javascript" enabled="true" />
        <add mimeType="*/*" enabled="false" />
      </dynamicTypes>
      <staticTypes>
        <add mimeType="text/*" enabled="true" />
        <add mimeType="message/*" enabled="true" />
        <add mimeType="application/javascript" enabled="true" />
        <add mimeType="*/*" enabled="false" />
      </staticTypes>
    </httpCompression>
  </system.webServer>
The Exam Ref explores the idea of programmatically compressing data using gZip, and since this section feels a bit thin, it's worth looking at. While I have one example from a production app, after comparing it to the examples in the MSDN article, I wonder if we didn't, perhaps, make it more complicated than necessary. We used a third party library, monkeyed with byte streams and such... yeah, way more complicated than it needed to be. Adapted the MSDN example and did the same thing in 10 lines of code that before we were doing in 40. Live and learn. This is a little console app that tests both, the results were identical:
using System;
using System.Collections.Generic;
using System.Diagnostics;
using System.IO;
using System.IO.Compression;
using System.Linq;
using System.Text;
using System.Threading.Tasks;
using ICSharpCode.SharpZipLib.Core;
using libZip = ICSharpCode.SharpZipLib.Zip;

namespace gzipper
{
    class Program
    {
        static void Main(string[] args)
        {
            string zipPath = @"c:\zipped.zip";
            string easyPath = @"c:\unzipped\easy";
            string safiresPath = @"c:\unzipped\safires";

            EasyExtract(zipPath, easyPath);
            ExtractSync(zipPath, safiresPath);
        }

        public static bool EasyExtract(string file, string extractLocation)
        {
            try
            {
                ZipFile.ExtractToDirectory(file, extractLocation);
            }
            catch (Exception ex)
            {
                Console.Error.Write(ex);
                return false;
            }

            return true;
        }

        //This is the code we used in Safires to extract the database
        //sync software, which was downloaded as a .zip file
        public static bool ExtractSync(string file, string extractLocation)
        {
            //Copied straight from Safire Desktop, file paths and zip file data changed.
            var zipFile = File.ReadAllBytes(file);

            libZip.ZipFile zf = null;

            try
            {
                zf = new libZip.ZipFile(new MemoryStream(zipFile));
                foreach (libZip.ZipEntry zipEntry in zf)
                {
                    if (!zipEntry.IsFile)
                        continue;
                    var entryFileName = zipEntry.Name;
                    var buffer = new byte[4096];
                    var zipStream = zf.GetInputStream(zipEntry);

                    var fullzipToPath = Path.Combine(extractLocation, entryFileName);
                    var directoryName = Path.GetDirectoryName(fullzipToPath);

                    if (!string.IsNullOrEmpty(directoryName))
                        Directory.CreateDirectory(directoryName);

                    using (var streamWriter = File.Create(fullzipToPath))
                    {
                        StreamUtils.Copy(zipStream, streamWriter, buffer);
                    }
                }
            }
            catch (Exception ex)
            {
                Console.Error.WriteLine("Error extracting symmetric archive", ex);
                return false;
            }
            finally
            {
                if (zf != null)
                {
                    zf.IsStreamOwner = true;
                    zf.Close();
                }

            }

            return true;
        }
    }
}
Plan a CDN
A Content Delivery Network, or CND, is a geographically distributed network of servers that are optimized to deliver static content to end users quickly. Images, script files, and css style sheets are examples of the kinds of assets that are appropriate to deliver from a CDN. Some libraries, like jQuery, operate their own CDN, which can simplify including these libraries in a project. Rather than downloading the libraries into a folder, simply include a script tag with the CDN location as the source:
<script src="//code.jquery.com/jquery-1.12.0.min.js"></script>
The double slash notation above is a relative reference. It is best practice to use this style rather than specifying the protocol explicitly, to prevent mixed content errors in the browser.
It is possible to create your own CDN in Azure. There are two versions: the "Classic" version which involves creating an "endpoint" in the old Azure Management Console, and the new "profile" version which works from the Azure Portal (seriously, when are they going to unify this stuff already??)... A cdn profile is a collection of endpoints.
CND endpoints work by delivering content cached in Cloud Storage, Cloud Service, Web App, or a custom origin. With the help of Azure Powershell, I was able to upload an image file to a blob container.

Ah yes, the classic trollface meme. So I then created an endpoint in both Azure Portal and Azure Management Studio (or whatever the old one is called). Here is the portal version:
 |
| I had to change the name to "failedturingtest"... |

And here is the old version:


The old version gives you a bit of an ugly generated domain, whereas the new version you have more control, though it probably doesn't matter since this is going to be working behind the scenes anyway. In order for the CDN to work, the resources it's connected to must be publicly accessible. For a storage account, that means setting the blob container to either "blob" or "container" access:
 |
| ugh... these blades.... why, Microsoft, why?? |
So not I have two different CDN links to the same file. Apparently it takes a while (15 min to an hour according to StackOverflow) for the CDN to recognize the file, so at first I was getting a 404 errors. I'll check back later.... yep, next evening worked fine. Not sure how long it took exactly... All four of these links download the same resource:
No comments:
Post a Comment