Motivation
I've been working on migrating our code repositories from CVS into git hosted on Visual Studio Team Services (VSTS)... formerly Visual Studio Online. While I've reduced the CVS migrations to running a single script, I also wanted to start exploring some of the other CI functionality VSTS offers. Many of our projects are Maven projects, and while Maven builds are supported, I ran into a snag trying to connect to our on-prem Nexus repository. Using the VSTS "hosted" build agents would involve one of a couple of bad work arounds:
- expose an endpoint in IIS to talk to the Nexus repo outside our firewall. While a one-off point to point fix might solve this issue... the scenario is likely to recur, especially when I start looking at deployments
- open a vpn connection from the hosted build agent to the network. Eww. This would feel like a clunky solution, assuming I could get it working at all. I could see authentication being a real obstacle for this route
The obvious solution was a private (i.e. on-prem) build agent running within our network. I shied away from this approach at first because I didn't want to deal with the server configuration (rightly so, yuck!), but it rapidly became clear that this actually was the simpler solution. The final straw was after I tried to create a Hudson job and ended up fighting with git the whole time (couldn't find the installed binary, installed it again, long file names choked, couldn't get authentication working... quelle nightmare!)
Base Installation
So this post applies to exactly two operating systems: Windows Server 2012 R2, and Windows Server 2008 R2. Because those are what I tried. Other versions of Windows, and probablye Mac and Linux for that matter, are probably quite similar, but YMMV.
Server 2012 is living on a VirtualBox VM on my work laptop. One core, 2GB memory, on top of a relatively modern ultrabook (the virtual harddrive lives on an external HDD, so it doesn't really benefit from the SSD speed).
Server 2008 is living on a relic laptop I dug out of cold storage a couple months ago because I wanted to play around with deploying web services to IIS. I might have been able to push my luck and install 2012, but the Dell Vostro 1000 only has 1GB memory and an economy CPU. This thing struggles at times running Chrome for crying out loud, so I stuck with 2008, for better or worse.
While installing the agent on 2012 was pretty smooth, I did run into a couple snags with 2008. For one, the installation script requires a newer version of PowerShell. I was able to install PowerShell 4 (along with the other Management Framework 4 tools) with no issue (download page). The other problem I ran into had to do with a security update that apparently came with 2012.
Both installation got .NET Framework 4.6 installed. I just used the defaults for everything and hit "next" through the installer. (download page)
The last bit of tweaking was to create a few directories in the root directory to organize the build agent stuff. The agent itself was installed in C:\agent. Java and Maven were installed in C:\agent_capabilities. I figured if I want to add other capabilities later, this would keep them well organized. Finally, I created a folder C:\agent_work, which will act as the workspace for the builds.
 |
| On the Vostro, "D" was the root... whatevs |
Add Maven Capability
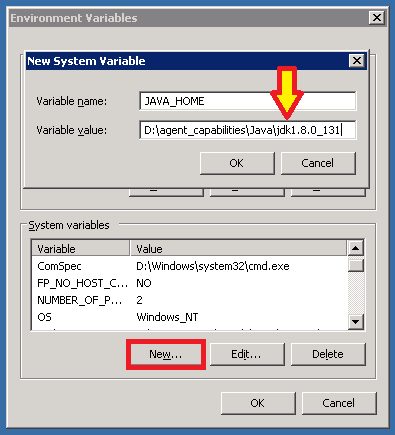
Before installing Maven (to the extent that Maven is "installed" at all), I installed Java. It's pretty straight forward: download the JDK installer from Oracle's download page, and install into the C:\agent_capabilities\Java directory.
 |
| JRE looks pretty much the same. |
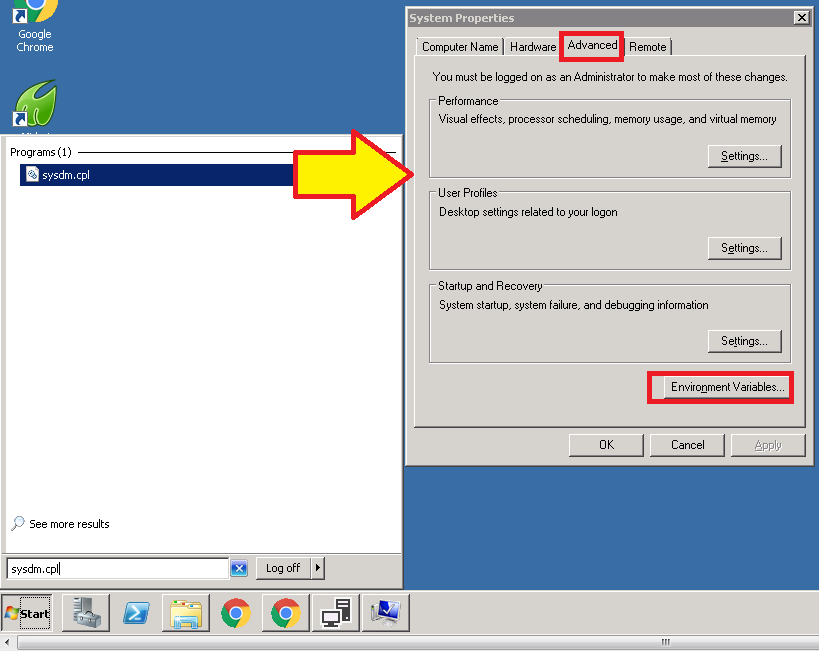
The bigger challenge is setting the environment variables. Not because setting environment variables is intrinsically hard... it's just that the server versions of Windows make it a pain in the ass to find. Well, at least 2012 did. Save yourself some frustration and bring up the System Properties dialog by running sysdm.cpl from the run menu. Go to the Advanced tab and the Environment Variables are right there:
Maven needs "JAVA_HOME" set to the jdk folder, and the "bin" subfolder needs to be on the path. I also threw JAVA_HOME unadorned on the path, though I'm not sure it's entirely necessary.
That done, you should be able to open a command line and confirm that both java and javac are available:

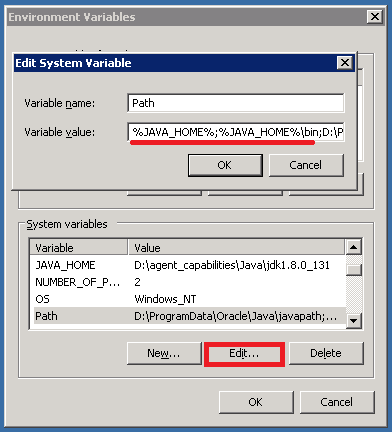
Installing Maven really amounts to nothing more than downloading it from Apache's download page and unzipping it into the destination folder. I put it in C:\agent_capabilities\Maven because obvious. If you were able to get the Java environment variables set up, the one (M2_HOME) for Maven is basically the same deal:

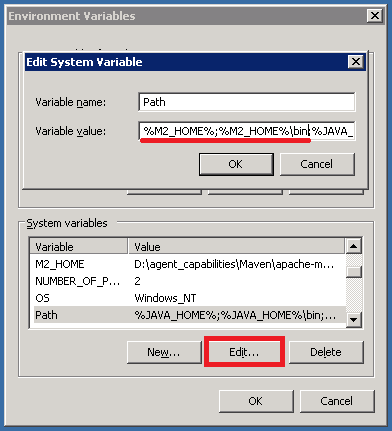
Make sure when you include %JAVA_HOME%\bin and %M2_HOME%\bin in the path, that you put in both percent symbols. I tried to add %JAVA_HOME\bin to my path and it took me a few minutes to figure out what was going wrong haha.
Create the Personal Access Token
It was surprisingly hard to find resources surrounding the actual agent installation. There is the reference doc on visualstudio.com, which is good for most of the process, but falls well short in explaining how to use the configuration script (more on that in a sec). In order for the build machine to talk to our visualstudio.com account, we have to give it an access token. We can create a token by navigating to https://<your_account>.visualstudio.com/_details/security/tokens, or navigating the GUI:


 |
| Don't worry, I revoked that token ;) |
I opened up Notepad and dropped the token in there.
When you boil it down, installing the agent is just a matter of A) downloading a zip file, B) uncompressing it, and C) running a config script. A and B are simple, and C should be, except the instructions are so anemic I ended up flopping around on the last bit for a while trying to figure out what the hell. Sigh...
So, the first step is to download the agent, which is done via an easy to use dialog found at https://<your_account>.visualstudio.com/_admin/_AgentPool, or again by navigating the GUI:


I was able to successfully run a Maven build using the 2012 agent (VirtualBoxTestAgent), because it was living inside our corporate network. Since the 2008 machine was at home, I would have had to VPN from the server to the network in order for builds to work on it. But being a production ready build machine was never in its future, I just needed a machine to recreate the install process and catch some screenshots.
Install Build Agent
When you boil it down, installing the agent is just a matter of A) downloading a zip file, B) uncompressing it, and C) running a config script. A and B are simple, and C should be, except the instructions are so anemic I ended up flopping around on the last bit for a while trying to figure out what the hell. Sigh...
So, the first step is to download the agent, which is done via an easy to use dialog found at https://<your_account>.visualstudio.com/_admin/_AgentPool, or again by navigating the GUI:

Download, unzip into C:\agent, open C:\agent in PowerShell, and run .\config.cmd. Easy right? Well that's what the docs would have you believe, but really there are about a dozen options to the script that need to be set for it to run right. Running .\config.cmd --help gives a bunch of examples (which helped me figure it out), but it would have been nice to see a formal description of each option in isolation... oh well. So here are the options I used:
- --unattended: so it will configure non-interactively
- --url: specify the VSTS base url
- --auth: VSTS only supports Personal Access Token (PAT)
- --token: Personal Access Token we created above
- --pool: this specifies which agent pool we are creating the agent in
- --agent: name of the agent. If existing, will be replaced as long as…
- --replace: … this option is included.
- --work: workspace where the builds are run
- --runasservice: installs the agent as a windows service so it starts automatically
So the final command looked something like this:
.\config.cmd --unattended --url https://<your_account>.visualstudio.com --auth PAT `
--token <toooooooooooooooooooooooooooooooooooken> --pool default `
--agent <agent_name> --replace --work c:\agent_work --runasservice
Tip: The backticks at the end of the first two lines let allow the PowerShell command to span multiple lines. Cool, ey?

After a few minutes, you'll be able to navigate back to the agent pool admin screen and see your build agent ready to go:

No comments:
Post a Comment