Doing this conversion basically requires a Linux environment. My first attempt was in Windows using the various Unix tooling and I just could never get everything to work the way it needed to. It was less work to just spin up a VirtualBox vm with Ubuntu Server and do everything in bash. This document is going to assume you have access to a suitable Linux environment (this will have a Debian-esque flavor being Ubuntu, but any major distro should work).
I’m also assuming you have zero prior CVS knowledge (like me), so I’ll explain a few of the basics around CVS.
CVS Primer
Coming from git land, the first thing that threw me off was the connection format with CVS. It’s not super difficult to grasp really, just different. Here is what one looks like:
:ext:twhorten@myserver.example.com:/var/lib/cvsroot
So breaking it down, there are several components (conveniently separated by colons):
This is generally set in an environment variable called CVSROOT, which CVS then uses to connect behind the scenes. So, on the command line, when I type “cvs checkout ProjectName”, CVS knows where to go look.
Now, the way CVS operates is very different from the way git operates. With git, what lives in the remote is essentially the same that that lives in your local machine (remote is generally a “bare” repo, i.e. there is no working tree, but that’s really the only difference). In CVS, what lives on the server and what you “checkout” are very different. This difference is important to understand in order to do the migration.
In the central CVS repo, what you have are a bunch of “version” files. The file names and structure basically match what you would expect, except all the files are suffixed with “,v”. When you check the repo out, you get just the expected files (minus the suffix). The other important bit of CVS infrastructure is the CSVROOT directory itself. This is not the directory in the connection string, but rather a directory that must exist within that directory. So your directory tree might look something like this:
Individual projects are stored as siblings to the CVSROOT directory, and are called “modules”.
One of the downsides of the ssh connection method is that it kept asking for my password. The easiest (and most secure) way around this is to generate a new ssh key and copy it to the server. this is done with two very easy command line commands:
ssh-keygen
ssh-copy-id username@server.domain.tld
ssh-keygen creates the key, and the ssh-copy-id puts it on the server. I had to enter my password one last time when I did ssh-copy-id, but that was it. The reason this is so critical is that some of our CVS repos were pretty large, and it didn’t seem impossible that some kind of networking issue would require the connection to be re-established. If this required me to reenter my password, kind of jacks up the flow. This way it’s all seamless.
CVS commits record just the author’s username, which (at least in our repos) were much less expressive than is typical in a git repo (First Last <email@example.com>). The conversion tool includes some code for mapping the old usernames to proper git names. Unfortunately there doesn’t seem to be an easy way of getting all the usernames out of a CVS repo. Googling got me a couple of promising starts (this StackOverflow answer in particular), but it took a bit of floundering to get a working command. The one I settled on looked like this:
cvs log -N <module> 2>&1 | grep -ohP ‘(?<=author: )[^;]+’ | sort | uniq
Ok, so, a lot going on here. The basic idea is that I’m getting the log for that modules, piping it to grep, grabbing the author, sorting it, and deduplicating. This will probably make more sense if we look at a log entry:

We can only run cvs log locally if we’ve checked out the code. The -N flag will prevent tags in the log (it didn’t seem to affect me much but it was in the StackOverflow code I found so I left it). The stream redirection 2>&1 is necessary to keep matching filenames from showing up in the output.
The bit right after author: is what we want. The StackOverflow code that gave me the log command did something with grep and awk that just gave me gibberish, so I had to work this part from scratch. So I guess that means it’s regex time… enter grep. The pattern we want should match everything that follows “author: “ until it hits a semicolon. So we have a pretty simple pattern with a lookbehind and a repeated negative character class:
(?<=author: )[^;]+
To get grep to behave, we need the following flags:
h - no filenames
o - only show the part of the line matching the pattern
P - Perl regex (to support lookback)
This done, grep spits out every author for every log entry, which unsurprisingly leads to a great deal of repetition. sort and uniq fix that problem easily, and we are left with a list of all the authors who worked on this module. Now we can map the 5% that still work at the company to their name and emails... -___-
On my first iteration, I attempted to use the built in git cvsimport tool. Unfortunately, it choked on the first CVS repo I ran it on (which was relatively small). So I found something else. The tool I ended up using is a Python program called cvs2git. In Ubuntu it’s actually part of a larger install package called cvs2svn, which makes for an easy install:
sudo apt-get install cvs2svn
Now, running this conversion isn’t as simple as pointing cvs2git at your CVS repo and hitting go. Fortunately, there are detailed instructions on the tools website. There is a great deal of configuration involved… well the potential for it anyway. The authors of cvs2svn included a number of templates in their Subversion repository. So oddly enough, I had to do an svn clone of their repo before I could do the conversion of mine, go figure. I started with cvs2git-example.options , but I had to make a couple corrections for it to work correctly:
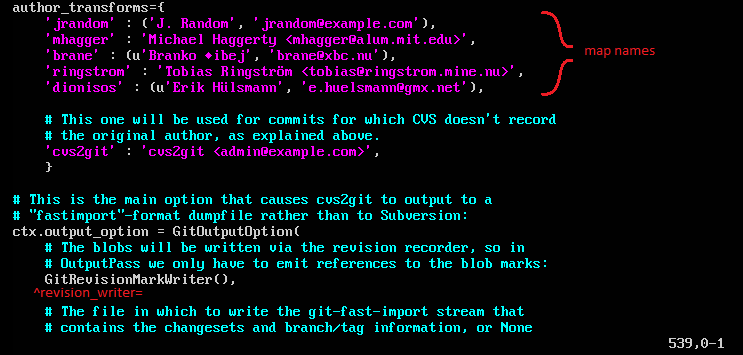
This option file is also where we use the usernames we extracted earlier (just above the line 538 fix…):
The last bit, which is arguably the most annoying part, is setting the location of the CVS module we want to convert. It’s annoying, because it isn’t a passed in parameter… you have to manually alter the options file after each run (if I had to do a bunch of these I would replace it with a token and use sed to swap it out automatically before running, probably as part of a larger bash script). This appears at line 571 of the original file (line number will change because of name mappings, though).
Now, the repo pointed to by this last path must be the raw CVS repo. I can not be a working copy (what you get with “cvs checkout”). And I couldn’t find a way to make it work with the remote (it wants a local copy). So for the conversion to work you must make a copy of the module you are converting, and the CVSROOT directory. In my case, I used scp to copy the repos locally using the same ssh connection as CVS (not concurrently, mind you, just the same credentials...)
Once we’ve made the necessary changes to the .options file, we can run the conversion (I renamed my filename mig.options for brevity’s sake):
cvs2git --options=mig.options
Depending on the size of the CVS repo, this process can take from a couple minutes to almost an hour (though if it’s taking that long it’s probably cause your repo is too big). When it finishes, you should see something like this:

This was for a small repo, and took less than a minute.
Once the conversion is run (as we’ve configured it so far), what we end up with is a subfolder “cvs2git-tmp”, with two files: git-blob.data and git-dump.dat. In the root folder (where we ran the cvs2git command from), create another folder. This is where we are going to be initializing the git repo, so name accordingly.
Change into that directory and run the following command:
git init --bare .git
this will create an empty, bare git repo. We create the repo bare because we don’t want to deal with a working tree (i.e. we don’t want to check anything out). To import the converted repo into our shiny new git repo, run this command (still in the git folder):
cat ../cvs2git-tmp/git-blob.dat ../cvs2git-tmp/git-dump.dat | git fast-import
I wish I could tell you why we have to concatenate the files, but I don’t know, I just know it’s necessary. We pipe this to git fast-import and tada, our repo is done. All that is left is to push it up to our BitBucket or GitHub repo.
As a side benefit, I noticed that the converted repos tended to be about 40% ish smaller than the corresponding CVS repos.
:ext:twhorten@myserver.example.com:/var/lib/cvsroot
So breaking it down, there are several components (conveniently separated by colons):
- :ext - this is the connection method. “ext” uses ssh to connect.
- :twhorten@myserver.example.com - this is the server where the cvs repo lives.
- :/var/lib/cvsroot - the subfolder on the server that holds the CVS repo(s).
This is generally set in an environment variable called CVSROOT, which CVS then uses to connect behind the scenes. So, on the command line, when I type “cvs checkout ProjectName”, CVS knows where to go look.
Now, the way CVS operates is very different from the way git operates. With git, what lives in the remote is essentially the same that that lives in your local machine (remote is generally a “bare” repo, i.e. there is no working tree, but that’s really the only difference). In CVS, what lives on the server and what you “checkout” are very different. This difference is important to understand in order to do the migration.
In the central CVS repo, what you have are a bunch of “version” files. The file names and structure basically match what you would expect, except all the files are suffixed with “,v”. When you check the repo out, you get just the expected files (minus the suffix). The other important bit of CVS infrastructure is the CSVROOT directory itself. This is not the directory in the connection string, but rather a directory that must exist within that directory. So your directory tree might look something like this:
- var
- lib
- cvsroot
- CVSROOT
- Module1
- Module2
Making an ssh CVS connection automatic
One of the downsides of the ssh connection method is that it kept asking for my password. The easiest (and most secure) way around this is to generate a new ssh key and copy it to the server. this is done with two very easy command line commands:
ssh-keygen
ssh-copy-id username@server.domain.tld
ssh-keygen creates the key, and the ssh-copy-id puts it on the server. I had to enter my password one last time when I did ssh-copy-id, but that was it. The reason this is so critical is that some of our CVS repos were pretty large, and it didn’t seem impossible that some kind of networking issue would require the connection to be re-established. If this required me to reenter my password, kind of jacks up the flow. This way it’s all seamless.
Finding all the CVS users in a module
CVS commits record just the author’s username, which (at least in our repos) were much less expressive than is typical in a git repo (First Last <email@example.com>). The conversion tool includes some code for mapping the old usernames to proper git names. Unfortunately there doesn’t seem to be an easy way of getting all the usernames out of a CVS repo. Googling got me a couple of promising starts (this StackOverflow answer in particular), but it took a bit of floundering to get a working command. The one I settled on looked like this:
cvs log -N <module> 2>&1 | grep -ohP ‘(?<=author: )[^;]+’ | sort | uniq
Ok, so, a lot going on here. The basic idea is that I’m getting the log for that modules, piping it to grep, grabbing the author, sorting it, and deduplicating. This will probably make more sense if we look at a log entry:
We can only run cvs log locally if we’ve checked out the code. The -N flag will prevent tags in the log (it didn’t seem to affect me much but it was in the StackOverflow code I found so I left it). The stream redirection 2>&1 is necessary to keep matching filenames from showing up in the output.
The bit right after author: is what we want. The StackOverflow code that gave me the log command did something with grep and awk that just gave me gibberish, so I had to work this part from scratch. So I guess that means it’s regex time… enter grep. The pattern we want should match everything that follows “author: “ until it hits a semicolon. So we have a pretty simple pattern with a lookbehind and a repeated negative character class:
(?<=author: )[^;]+
To get grep to behave, we need the following flags:
h - no filenames
o - only show the part of the line matching the pattern
P - Perl regex (to support lookback)
This done, grep spits out every author for every log entry, which unsurprisingly leads to a great deal of repetition. sort and uniq fix that problem easily, and we are left with a list of all the authors who worked on this module. Now we can map the 5% that still work at the company to their name and emails... -___-
Set up the conversion
On my first iteration, I attempted to use the built in git cvsimport tool. Unfortunately, it choked on the first CVS repo I ran it on (which was relatively small). So I found something else. The tool I ended up using is a Python program called cvs2git. In Ubuntu it’s actually part of a larger install package called cvs2svn, which makes for an easy install:
sudo apt-get install cvs2svn
Now, running this conversion isn’t as simple as pointing cvs2git at your CVS repo and hitting go. Fortunately, there are detailed instructions on the tools website. There is a great deal of configuration involved… well the potential for it anyway. The authors of cvs2svn included a number of templates in their Subversion repository. So oddly enough, I had to do an svn clone of their repo before I could do the conversion of mine, go figure. I started with cvs2git-example.options , but I had to make a couple corrections for it to work correctly:
- Line 160, begin line with revision_reader=
- Line 538, begin line with revision_writer=
- Starting line 195, I had to uncomment some of the other encodings
These line numbers are for the otherwise unchanged file. You can actually see it on their Github page. I’m surprised they haven’t fixed it yet since it’s been a known issue for over a year… maybe I should do a pull request.
This option file is also where we use the usernames we extracted earlier (just above the line 538 fix…):
The last bit, which is arguably the most annoying part, is setting the location of the CVS module we want to convert. It’s annoying, because it isn’t a passed in parameter… you have to manually alter the options file after each run (if I had to do a bunch of these I would replace it with a token and use sed to swap it out automatically before running, probably as part of a larger bash script). This appears at line 571 of the original file (line number will change because of name mappings, though).
Now, the repo pointed to by this last path must be the raw CVS repo. I can not be a working copy (what you get with “cvs checkout”). And I couldn’t find a way to make it work with the remote (it wants a local copy). So for the conversion to work you must make a copy of the module you are converting, and the CVSROOT directory. In my case, I used scp to copy the repos locally using the same ssh connection as CVS (not concurrently, mind you, just the same credentials...)
Run the conversion
Once we’ve made the necessary changes to the .options file, we can run the conversion (I renamed my filename mig.options for brevity’s sake):
cvs2git --options=mig.options
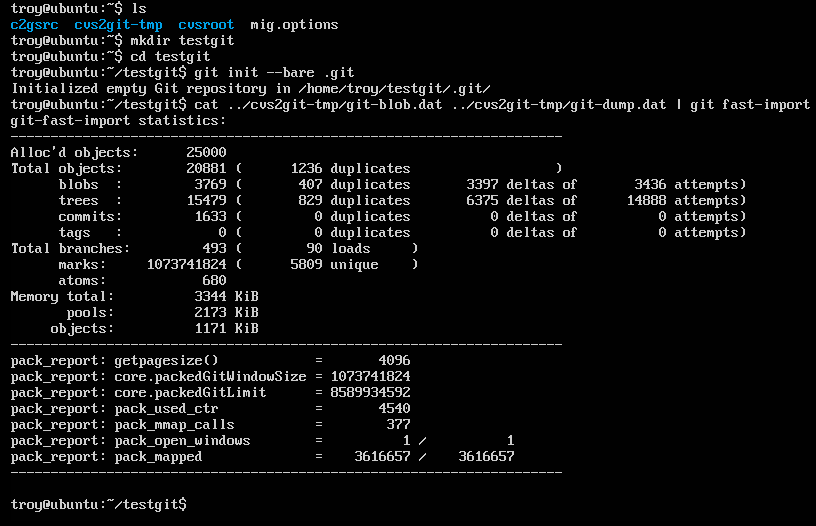
Depending on the size of the CVS repo, this process can take from a couple minutes to almost an hour (though if it’s taking that long it’s probably cause your repo is too big). When it finishes, you should see something like this:
This was for a small repo, and took less than a minute.
Once the conversion is run (as we’ve configured it so far), what we end up with is a subfolder “cvs2git-tmp”, with two files: git-blob.data and git-dump.dat. In the root folder (where we ran the cvs2git command from), create another folder. This is where we are going to be initializing the git repo, so name accordingly.
Change into that directory and run the following command:
git init --bare .git
this will create an empty, bare git repo. We create the repo bare because we don’t want to deal with a working tree (i.e. we don’t want to check anything out). To import the converted repo into our shiny new git repo, run this command (still in the git folder):
cat ../cvs2git-tmp/git-blob.dat ../cvs2git-tmp/git-dump.dat | git fast-import
I wish I could tell you why we have to concatenate the files, but I don’t know, I just know it’s necessary. We pipe this to git fast-import and tada, our repo is done. All that is left is to push it up to our BitBucket or GitHub repo.
As a side benefit, I noticed that the converted repos tended to be about 40% ish smaller than the corresponding CVS repos.
No comments:
Post a Comment